Showing posts with label Valentine's Day. Show all posts

Sunday, January 27, 2013

Non Traditional Valentines


pc10
I previously posted (click HERE to view post) pictures of some of my deli paper backgrounds I made. I'm often asked (not sure why) what I do with the backgrounds, so I thought I'd show you just one of many ways I use them.  Some other ways are in journals, on canvases, wood ATBs, and as wrapping paper the possibilities are endless!
(Click Pictures to enlarge)
pc1
Here is the deli paper background I started with.  It measures 11"x 11"
pc2
I folded it as small as I could to fit the heart shape die
I was going to use.
pc3 Here you can see the Spellbinder heart die I used with my Sizzix BigKick.  FYI: You do not need a die cut machine just free hand cut or use a cookie cutter and trace around the shape you want. pc4
I can't remember for sure, but I believe I counted 16 hearts I cut out of this one piece of deli paper just by folding it.
pc5
I wrote on the paint chip with a plain white gel pen.
For my base I used a Valspar color paint chip sample from Lowes.  This particular brand is the only one I've come across that is this large.
pc6 I hit the gel pen with my heat gun just to make sure it was dry then I adhered my two deli paper hearts with some semi gloss gel medium.  You can use what suits you. I prefer matte or semi gloss over gloss just because I don't like how the gloss makes things stick to it.
pc7 On another card I stamped some white gesso with a rubber and foam stamp both. pc8
Once the gesso was dry I spritz it with some of my Color Mists and dried it again with the heat gun.  I then adhered the hearts and wording to the card.
pc9
Finished Postcard 1.Here you can see that
I added some edging around the hearts with  black Pitt pen and the white gel pen.
pc10Finished Postcard 2. 
pc11 Finished Postcard 3. pc12 Finished Postcard 4.

Monday, February 13, 2012

Groovy Kind of Love


Here's a piece I just finished to give to hubby for Valentine's Day using our wedding song Groovy Kind of Love by Phil Collins.  I gleamed the idea from Scoutandnimble.com. which I of course discovered on Pinterest. On my piece though I wanted to give it a more aged layered look, so I first misted my blank canvas with  Color Mists (Copper Kettle, Tiger's Eye Brown and 22 Karat Gold).  I then Let it drip and run while I dried it with the heat gun and then sealed the first layer with PYM II.  Next after printing the sheet music I tore the edges around the entire piece sheet of music so it wasn't a clean line and then adhered it to the canvas using Golden's semi-gloss soft gel medium.  Once that was dry I misted it several more times with the Color Mists letting it run and drip as I dried it with the heat gun.  I then stamped using stamp and white and black gesso and gold metallic paint.  Dried it again with the heat gun letting some of the paint bubble up and then misted several more layers of Color Mists then sealed it completely with another layer of soft gel medium.  I'm pretty happy with how it turned out. Knowing it was for hubby I had to keep myself from going overboard on it which was probably the hardest part.  I'll let you know how he likes it when I give it to him tomorrow.

Friday, February 10, 2012

Valentine Card & Heart Shaped Cupcakes


Click the picture above, save & download 
this freebie Valentine Card

Heart Shaped Cupcakes
I gleamed this idea from where else, but Pinterest. 
You can find just about anything on there. I've 
been just waiting for a chance to try it out.  It said 
you could use marbles or foil and since I didn't have 
any marbles I opted for foil. 
 It seemed to work just fine rolling a small ball of foil
up to keep the liner indented to look like a heart. 
I probably could have filled them a little fuller, but I 
was afraid if they rose up too much they'd loose 
their heart shape.

Here's the Pièce de résistance


I also made some mini cupcakes with the remaining
 cake batter.

Wednesday, February 08, 2012

Valentine Cards

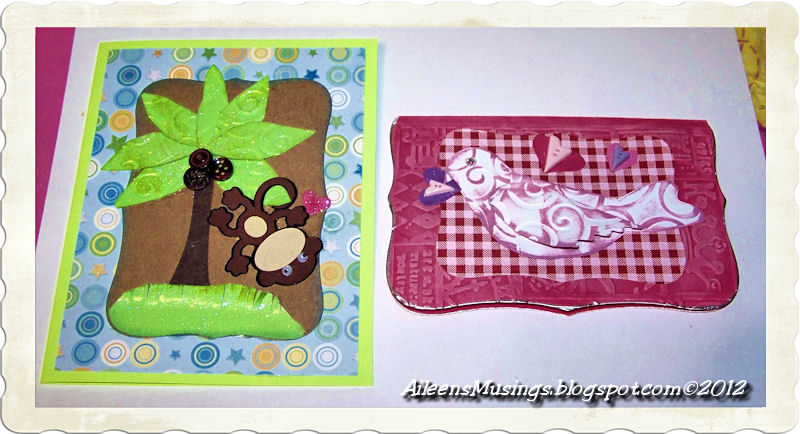
Here's  a few Valentine's Day cards I made yesterday. It's
been awhile since I've made cards..actually a long while
I felt a bit out of practice.  I especially love the monkey
one I made for Mr. Kevin.  It doesn't really look 
Valentiney but I am happy with it :-)


Tuesday, February 15, 2011

Valentine Treat!

Here's a mega size treat I made for hubby for V-day!
Layers of cake and sugary goodness inside a giant Martini glass!
Nope he wasn't able to finish it but he managed to eat the rest last night LOL

For unique gifts visit

Monday, February 14, 2011

Tuesday, February 09, 2010

Fractured Cupid Tales

Meet Granny Cupid my newest whimsical character I just finished drawing and cleaning up.  She's quite the teller of dented love stories. Just a bit of warning here her cupid's wand can get a bit wonky at times though she does have the best of intentions. . .


Granny's arrived just in time for 
Valentine's Day to give you some 
of her warped sage advice:


"Love is like buying on ebay...it sounds 
really good in the description until it arrives 
at your door--Deal with it!" -Granny Cupid 
 ***
"Husbands are like your favorite underwear...
just when you've broke them in it's time to 
throw them out!"-Granny Cupid
***
"Love is like bad breath...deal with it!"
-Granny Cupid


 Visit My Zazzle Store 
& view my newest additions!


Thursday, February 04, 2010

Mailable Valentine & Birthday Card Canvas Panel

valen8 hbflowr
Here are two cards I've made using canvas flower panels.  One I created for Valentine's Day and the other for  a special someone's birthday.  I plan to mail these as is in the mail without envelopes.  I have mailed many things as is in the mail from shoes to tins so don't let them tell you that you can't do it.  After all if people can mail live chickens you can certainly mail a little ole canvas panel :-)
Supplies Used

Canvas Flower Panel (Can be purchased Here)

Acrylic Paints

StazOn Ink & Chalk Inks

Stamps

Foam Roller or Brayer

White Paint Pen (Can be purchased Here)

Black Sharpie

Punchinella (Can be purchased Here)

Ribbon
PYMII (Can be purchased Here)
    valen1
    Using the foam roller roll on your paint or you can use a paint brush.
    valen2
    Once piece is completely dry using StazOn ink stamp  your message on to flower panel. 
    valen3
    Add color to help pop your piece using chalk inks around the edges.
    valen4
    To add more depth stamp through Punchinella, stencils or doilies using chalk inks.
    valen5
    Turn flower panel over and add your addresses using a black sharpie pen.
    valen7
    Seal & protect the entire piece using the awesome PYMII.

    Saturday, September 12, 2009

    Felt Love Banner

    Valentine Love Banner
    A little early for Valentines Day but here's a
    felt love banner using pre stiffened felt,
    felt trim and silver sequin trim, rhinestone
    and flocked lettering.

    Visit my Zazzle Store &
    view my newest Halloween additions!


    Saturday, February 14, 2009

    Happy Valentine's Day!

    Happy Valentine's Day blog friends!
    In honor of V-day I'm offering a love coupon for
    when checking out use the coupon code "love"
    and receive $3.00 off your order of $20.00 or more.


    <==check the archives to view previous posts

    Tuesday, February 10, 2009

    Be Mine

    BE MINE
    Just in time for Valentine's Day another digi piece. I used one of my freebie images and Corel's Paint Shop Pro for this piece.

    <==check the archives to view previous posts