Here's a Crafty Blogger Blurb addition:
Diary of a Crafty Chica Kathy gets crafty with words and shares a cautionary tale about the perils of cake in the office. http://thecraftychica.blogspot.com/2008/05/chica-lit-blog-tour-cake-girl-no-more.html

Saturday, May 31, 2008
Friday, May 30, 2008
Crafty Blogger Blurb Friday!

Craftside- A behind-the-scenes peek at a crafty world
This week at Craftside there are a bunch of great patterns and how-to's including a clip on cell phone case, jewelry with words, 2 winged embroidery templates used on a spa mask and cold pack cozy, a crocheted flower pattern and altered images and techniques.
http://craftside.typepad.com/craftside/may_2130/index.html
Crafty Princess Diaries
Love books and beads? Then you'll love this call for entries from Interweave Press.
http://www.tammypowley.com/?p=76
Cross Stitch Bracelet
Stitch up quick Cross Stitch bling using floss and plastic canvas.
http://crossstitch.about.com/od/finishedproducts/ht/braceletcrossst.htm
Layers Upon Layers
The year-long Bead Journal Project is winding down, and Cyndi is thrilled to be finished!!
http://www.layersuponlayers.com/bead-journal-project-aprils-grass-moon/
Polymer Clay CraftGossip
Here's the scoop on making your own polymer clay buttons.
http://polymerclay.craftgossip.com/polymer-clay-buttons/2008/05/29
Stefanie Girard's Sweater Surgery
Over at Sweater Surgery there are a bunch of cross stitch sayings and note cards made from photos of the sayings.
http://sweatersurgery.blogspot.com/2008/05/mothers-day-cross-stitch-done-and_28.html
The Impatient Blogger
Join The Impatient Crafter Margot Potter in this cheeky video tutorial on making UTEE glittered skull jewelry. It's magically craftlicious!
http://margotpotter.blogspot.com/2008/05/impatient-crafter-presents-glitterati.html
Thursday, May 29, 2008
The Fairy Houses have landed!

I just love when an idea hits me from out of no where! Last week I was at my table talking on the phone and I noticed some of my mini wooden birdhouses that had been sitting there forever waiting for me to do something with them! They were right next to some paper flowers I had just received, so while chatting I began playing with the paper flowers and VIOLA an idea was born! I am totally addicted to making these little birdhouses now!
Check out my Fairy Birdhouse Tutorial at the link below and see more of my mini birdhouses:
Sunday, May 25, 2008
Instant Replay
In honor of Memorial Day and veterans, I thought I'd post an instant replay of some past digital art I did.

I did this piece a couple of years ago for my nephew who's in the Marines. My sister had it printed and wrapped on canvas.

This is a pre picture of myself and my family (I'm the cute one in my mom's arms) this dates back to Memorial Day 1965. My father retired from the marines after over 20 years of service.

Here's the finished piece after I did my digital mojo on it ;-)
Saturday, May 24, 2008
To Cover or Not to Cover....

Sometimes I start out rearing to go with a great idea for a background in mind and it all comes together, so much so that I fall in love with the background, and then I have a hard time covering it up. Such is the case with this piece I created the background on a 6x6 chunky canvas by first adhering pages from a book using fluid matte medium on the front and the sides of the canvas. I then gave it a light coat of Golden's titanium buff fluid acrylic mixed with a bit of transparent glaze. After that I added other colors mixed with glaze, rings of color from gesso and acrylics and then splattered it with watered down acrylic . The sides I painted black and white striped and  then accented the edges with a water soluble oil pastel stick.
I loved the depth it has and how you can see a hint of the text from the book pages, but now what? I couldn't decide what to put on the front and there it sat for several weeks staring at me I hated the thought of covering the background up and nothing seemed worthy silly as that sounds! Until I finally decided to just go for it and cut a moon shape out of a book page and painted it with acrylics and then adhered it with gel medium. I'm loving it now and will probably do a matching sun to go with it.
I've come to realize my favorite part of creating a piece is creating the background yet with that comes the hard part of taking that next step to put something on the background. I wonder if other people have a problem with this as well, do you?
Friday, May 23, 2008
It's Crafty Blogger Blurb Friday

Check out the following crafty blogs that are chockfull of ideas, inspirations and more! Don't forget to check back each Friday for new Crafty blog blurbs!
- Craftside- A behind-the-scenes peek at a crafty world Over at the Craftside blog there is a chance to win a copy of Retro knits and 1000 Artist Trading Cards, a beaded butterfly pattern, and more spring crafty goodness.
http://craftside.typepad.com/ - Crafty Prinecess Diaries-What does Jane Austen have to do with craft trends? Tammy tells you what we can learn about crafting and following trends from Dear Jane.
http://www.tammypowley.com/?p=75 - Diary of a Crafty Chica - CONTEST!
Tell Kathy why you are a crafty chica too, and you may win a hecka lot of prizes!
http://thecraftychica.blogspot.com/2008/05/crafty-chica-contest.html - Layers Upon Layers-Cyndi has compiled a list of her tutorials on mixing digital work into your mixed media!
http://www.layersuponlayers.com/digital-effects-posts - Polymer Clay: Craft Gossip -Need the low down on making dozens of different polymer clay beads? Heather reviews a handy book that might just be your recipe to beadmaking success.
http://polymerclay.craftgossip.com/book-review-making-polymer-clay-beads/2008/05/14 - Sweater Surgery-Stefanie updates an old pin cushion project and makes an eyeglass case out of old felted wool sweaters, paints a rock and gives you an inside peek at her creative space.
http://sweatersurgery.blogspot.com/ - The Impatient Blogger-Madge shares some photos and impressions from her recent trip to Tokyo for CHA to HAJ.
http://margotpotter.blogspot.com/2008/05/madges-tokyo-tales-part-one.html - Aileen's Musings -Aileen offers a groovy tutorial on altering a cabinet card using gouache paints.
Wednesday, May 21, 2008
Put your own flourish on things...
 This week's Gothic Arch challenge is Flourishes so in the process of making my challenge this week I got to thinking how the altered artist in me can't help but come out. I tend to look for things that are versatile where I can put my own flourish on things so to speak or alter it if you will to what I need at the time.
Recently I was gifted by my buddy Kris with some fun  paper flowers. Of course I couldn't just leave them as is so I misted them using my Color Mists using Copper Kettle , Monterey Bay and 22 karat gold . I then dried them with my heat gun and watched them puff back up which was very cool!
 Here they are all dried .....if you click on the picture you might be able to see their shimmer.
Check out the paper beneath the flowers I sprayed  them on, I thought it turned out very cool looking it will go in my stash to use later.
 Next I decided to ink the edges with chalk inks (love chalk inks because they dry so quickly, I think they're would probably be one of those supplies for me that I wouldn't want to be without them, I use them that much!). I then added some rub-on flowers to the centers of the paper flowers. Along with the flowers I altered I also altered the chipboard letter "B" by adding inks and rub-ons and also the bird, it was originally light aqua and I used brown chalk inks on it to change it's color. So the moral of this long winded post is don't be afraid to add your own touch to embellishments.
Happy Altering!
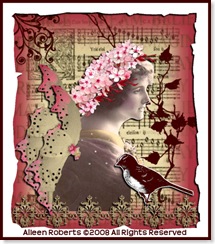
Saturday, May 17, 2008
Altered Cabinet Card Tutorial
 Here's an altered cabinet card I just finished. I painted it using gouache (pronounced gwash) watercolors. Click the link below to check out the tutorial I created:
Thursday, May 15, 2008
You know it's a good day...
...when you find $30.00 in your pants pocket whoohoo!
 Here's a digital piece I finished up.

(click the image to enlarge)
Tuesday, May 13, 2008
Mail Art Challenge
I keep forgetting to mention that the mail art tin I mailed arrived at its  destination intact and good shape! You can read more about Karen's mail art adventure on her blog. At the last min before I mailed Nellie in her tin I decided to put her in a plastic envie so the window didn't get scratched and added the stamps to the outside and the address I left on the inside.
I challenge you to send something fun through the mail and share with me what you sent :-)
Monday, May 12, 2008
Viva la France!
 Here's this week's Gothic arch challenge the theme is Viva La France. I used a Vintage French wine label for my background.
Sunday, May 11, 2008
My Mother's Day Project
Here are a couple of pictures of 3 of my 4 guys working on my
requestedMother's Day project. Its the one day out of the year that I specifically ask for a project I would like done instead of a gift. In past years they have surprised me with things they have built (chairs, brick walkways and, planters).
This year I asked to have our arbor/arch
that sits at the opening of the walkway to our front door painted orange to go with the soon to be painted front door.


 They now resemble a close likeness to Oompa Loompas from the orange over-spray LOL
Saturday, May 10, 2008
Celebrations
Happy Mother's Day!
To all you mom's out there, the unsung heros! If you have a mom in your life celebrate her and enjoy the time you have and give her a big hug! I miss being able to hug my mom.
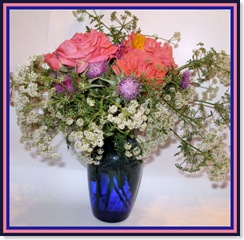 My son and hubby gifted me with a beautiful bouquet of flowers they picked while out on a bike ride today. I thought my son did a great job arranging them in the vase.

Celebrate Friends...

is the theme of this wooden shadow box shrine I created. I first painted it with acrylic paints and then added paper in the backs of the cubbies.
I've been wanting to play with the wooden shadow boxes I sell on OTM and 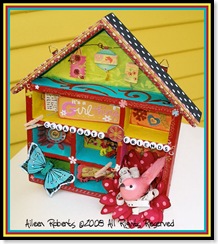 finally gave myself permission to play....do you ever do this to yourself? I'm forever telling myself that I have to do such and such first before I can play....I suppose if I didn't do this I would just play all the time and never get anything else accomplished.

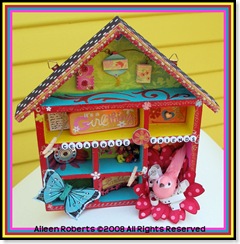 I knew I wanted to use the color combination that I did, I just wasn't sure what I was going to put into the cubbies, but it eventually came together as I used up things I've had.

*You should be able to click on all the pictures and enlarge them for better viewing.
Wednesday, May 07, 2008
Lottery and Challenge
 This week's Gothic Arch challenge is Chair.
To all the wonderful and supportive people from the Gothic Arch challenge and others you've been very kind to go out of your way to take time to look and leave comments here
THANK YOU!
 This month's lottery theme
 is making fun of "Men" this seemed appropriate.
I'm so glad GI JOE didn't mind posing for me
to use him on this over-sized tag ;-)
Friday, May 02, 2008
Software Recommendation
I just have to share a software recommendation.... if your a blogger that gets frustrated because you can't get pictures uploaded and sized right and things go wonky for you check out WINDOWS LIVE WRITER and download a free copy. I've come across this software mentioned several times and finally took the time to download it (not that it took anytime at all) and loaded and I have to say its very user friendly, I'm loving it! Click the following link to read more about it and download your own copy: http://get.live.com/writer/overview
A little Play time
I've been busy the last few days creating a couple of pieces just for fun...not because it was for an obligation, swap or specific purpose, but just because and man did it feel good!
(remember to click images to enlarge them)
I began the first piece by using another wood palette as my base. I gessoed it and then misted it with repeated layers of  Color Mists using the heat gun to dry in-between layers. I then sealed it with PYM II . After it dried which is extremely quick, I drew the image and painted it in with Gouache watercolor paints and then sealed again. The bubble was cut out from the text of a book page and sealed with matte fluid acrylic and then painted with 2 coats of transparent glaze mixed with Golden's Titan Buff and once dry the wording was added using a rub-on and then sealed again. I drilled holes with the drill press and added the wire and beads.

 ATTITUDE is a chunky 6 x 6 canvas. I started by creating a frame around the sides and border using book pages. I then painted over that with a couple of coats of transparent glaze mixed with Golden's Titan Buff to cover up the wording just enough. After that I painted the center with acrylics and wrote into the wet paint with a rubber tip some wording, once that was dry I painted the image using gouache watercolor paints and water soluble oil pastels then sealed it with PYMII.

Subscribe to:
Posts (Atom)