Sunday, September 28, 2008

Guilty Pleasure

I'm admitting to my guilty pleasure my sister has enticed me by gifting me a book for my birthday...I must state these are not the typical books I like to read so I was pleasantly surprised when I did like them and "got hooked!" The books are written by Stephenie Meyer and titled: Twilight, New Moon, Eclipse, and Breaking Dawn. I have always been an avid reader, but sadly between business and having to steal time for art I quit reading unless a good author comes along that hooks me! That's exactly what with this new series did, damn my sister for tempting me with this drug! I'm very excited to learn that the first book will be made into a movie coming out Nov. 21st.

They're classified as young adult books, but none the less they have been fun to read. Although, I would consider them light reading and rather doubt they would win any great literary awards I did them enjoy. I think it helped that I had no clue about them and was not caught up in the hype therefore I had no preconcieved expectations so there was no disappointment on my part.

Read the following Summary from Twilight the book One:

Bella Swan's move to Forks, a small, perpetually rainy town in Washington, could have been the most boring move she ever made. But once she meets the mysterious and alluring Edward Cullen, Bella's life takes a thrilling and terrifying turn. Up until now, Edward has managed to keep his vampire identity a secret in the small community he lives in, but now nobody is safe, especially Bella, the person Edward holds most dear. Deeply romantic and extraordinarily suspenseful, Twilight captures the struggle between defying our instincts and satisfying our desires. This is a love story with bite.

From School Library JournalGrade 9 Up–When Bella Swan moves from sunny Phoenix to Forks, Washington, a damp and dreary town known for the most rainfall in the United States, to live with her dad, she isn't expecting to like it. But the level of hostility displayed by her standoffish high school biology lab partner, Edward Cullen, surprises her. After several strange interactions, his preternatural beauty, strength, and speed have her intrigued. Edward is just as fascinated with Bella, and their attraction to one another grows. As Bella discovers more about Edwards nature and his family, she is thrown headlong into a dangerous adventure that has her making a desperate sacrifice to save her one true love. One of the more original vampire constructs around, this recording of Stephenie Meyers debut novel (Megan Tingley Books, 2005) is narrated with great style by Ilyana Kadushin, who makes the infinitely romantic tale of star-crossed lovers resonate with a bittersweet edge. Although Edward and Bellas romance and subsequent danger develops slowly, the pacing is appropriate for teens who want learn all the details in this suspenseful tale. An excellent purchase for both school and public libraries.–Charli Osborne, Oxford Public Library, MI Copyright © Reed Business Information, a division of Reed Elsevier Inc. All rights reserved.

<==check the archives to view previous posts

Friday, September 26, 2008

Witchy Witch!

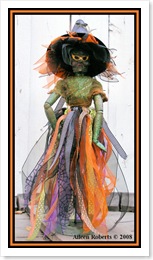
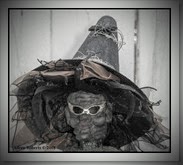
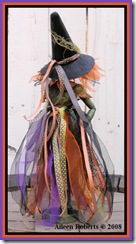
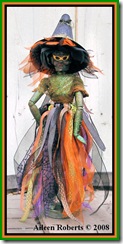
Meet Zoraida, she's just flown in on Air Broom. She wanted to be here in plenty of time for the Art Muse Contest since she's one of the MCs!

witch1 witch3
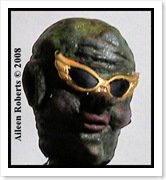
A face only a mother could love!
witch5

Close up of face I created using air dry paper clay.

witch2
witch4

I used gray spray webbing first on the artist manikin giving her pock riddled skin. I then colored her with Emerald Isle green & Lime Jello Color Mists and sealed the entire doll with PYM II.

Crafty Blogger Blurb Friday!


Crafty Princess Diaries Are Halloween crafts on your list of things to do? How about a little lampwork ghost lariat? The Crafty Princess has a few other Halloween goodie ideas floating around in her head right now.

Layers Upon Layers Do you find yourself snapping pictures of things just for their texture? Cyndi wants to know what you do with these shots.

Stefanie Girard's Sweater Surgery Here's looking at you kid! "See" a pair of mosaic lawn eyes made from some old bowling balls.

The Impatient Blogger Come see the entries in The Impatient Crafter Happy Cute Make Kewpie Doll Challenge 2008!


About Family Crafts Check out this special events calendar to find out what holidays, birthdays, and other events are celebrated in the month of October; plus, find ideas for crafts, games, and other activities to help you celebrate.

About.com Cross Stitch Halloween is coming soon, but there's still time to stitch some designs to add to treat bags, t-shirts, or Halloween trees.

Cathie Filian Check out Cathie's top 10 pumpkin tips and cozy up to fall with recipes for a homemade butternut squash soup and an ultimate grilled cheese sandwich.

<==check the archives to view previous posts

Thursday, September 25, 2008

Deli Paper Background Tutorial


I've had several requests for a tutorial on using color mists with deli paper paper so I've created a slideshow (I'll work on getting one up with static pictures for those that are able to view slideshows).
Why do I love deli paper? I thought you'd never ask! The type of deli paper I use is actually a sandwich wrap with a wet strength to it. What this means is that it looks and feels like tissue paper but yet its strong and durable. You can stature deli paper and it doesn't rip or tear yet it's thin and opaque.
Supplies Used
White Gesso
Foam Stamps
Heat Gun
Step 1. Mist the deli paper using various colors working from light to dark
(Alternate using metalic colors to add shimmer and sparkle).
Step 2. Once your done misting the paper crumple the paper up to further saturate it.
Step 3. Mist further as needed while the paper is crumpled turning with each spray.
Step 4. Using a heat gun begin drying your crumpled paper--keep the heat gun moving so keep from over heating. As the crumpled paper begins to dry it will slowly begin to open up some--continue helping it open up as you finish drying the paper.
Step 5. Once the paper is dry smooth it out using your hands.
Step 6. Squeeze out some gesso on a palette, using a make-up sponge blot gesso onto your foam stamp and then begin stamping randomly onto your colored deli paper. **Tip-rotate your paper as you stamp to give it a more randomly look.
Step 7. Dry the wet gesso on your deli paper with the heat gun.
*Optional Ideas*
A. Once you dry the gesso you can mist the paper again and then dry with the heat gun.
B. Bring out the colors further by using chalk inks near the stamped gesso designs.
C. Stamp with gold leafing paint to give further depth once your gesso has dried.

Click HERE to check out more Deli Paper Backgrounds.

<==check the archives to view previous posts

Sunday, September 21, 2008

Crafty Blogger Blur Sunday!


Cathie Filian Halloween is just around the corner so fly on over to Cathie Filian’s blog for some spooky new ideas and frightfully fun projects.


About Family Crafts Check out these spotlight crafts... Make everything from a sccarecrow candy jar to a Beaded Safety Pin Bear.

About.com Cross Stitch Connie has been feathering her stitching nest. Find out how she made her stitching spot work.

Craftside-A behind-the-scenes peek at a crafty world Work and play are in full fall swing this week at Craftside with news like the Crafty Chica giving away a space on her cruise, a job opportunity for a Marketing Specialist at The Quayside Publishing Group, Lisa Engelbrecht signing and demoing at Barnes & Noble, and of course two fun craft projects; a funky recycled denim purse with motorcycle gear handles and tiny needle felted pumpkins.

Crafty Princess Diaries Flower power time! Tammy posts about a CFE over at CraftStylish for all your flower fanatics.

Layers Upon Layers One of the most frequently asked questions at Layers Upon Layers is how to do image transfers. Here are Cyndi's favorite methods and tutorials for each!

Stefanie Girard's Sweater Surgery See some pumpkins that are "carved" out of some cute sweaters and a classic saying in cross stitch.


The impatient Bloggger-What's your brand? Madge shares some thoughts about branding and a new demo reel in this thought provoking post.

<==check the archives to view previous posts

Wednesday, September 17, 2008

Another Día De Los Muertos Project

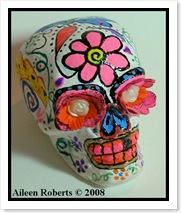
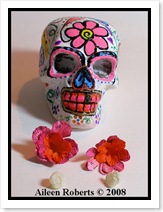
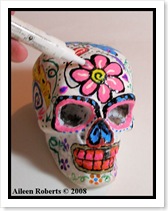
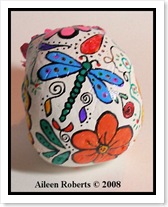
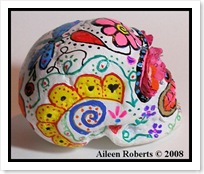
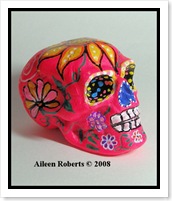
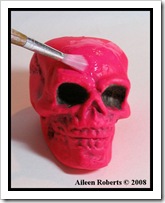
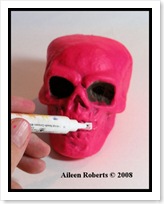
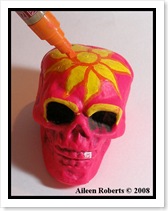
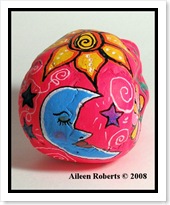
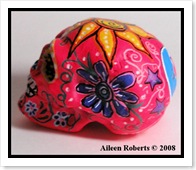
I've had some fun creating another Día De Los Muertos (Day of the Dead) project. Here's my decorated Calaveras (skulls) to resemble the decorated sugar skulls that are made for the Día De Los Muertos festivities.
Supplies Used
Foam Skull (click link to order)
Sailor Pens
Zig Paint Pens
Sakura Glaze Pens
Gesso
Fluorescent Acrylic Paints (Optional)
skeleton1
Skull Size 4 1/2"
(Click images to enlarge)
ddskel ddskel1
ddskel2 ddskelbk
ddskelsd pkskel3
pkskel0 pkskel
pkskel1pkskel2
pkskel4
*As an alternative instead of painting is to collage onto the skull using selected images.
Click Here for more Day of the Dead Products

Sunday, September 14, 2008

Art Comes in all forms

stove

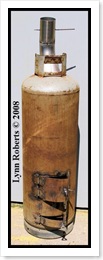
I just had to share my husband's creation. It's not finished but I wanted to show a picture of it where you could still tell what it was. I sometimes forget what a great altered artist he is, and how much he inspires me! This is a wood burning stove he created for his garage. Its made from a large propane tank that was discarded.

Saturday, September 13, 2008

Gifts of Hope

Kris and I created this altered birdcage for the doll to
hold in her hands for the Ties That Bind Project.
I finished my altered tie for the Ties That Bind Project to benefit ovarian cancer. It started out as a tan stripped tie and I colored it with Tahoe Turquoise and Platinum White Color Mists. Paper flowers colored again with the Color Mists and added the ribbon and foil butterfly. I had to laugh at myself because we're only suppose to decorate 8 inches of the tie and by the time I was done my 8 inches grew to 12 inches LOL I guess I got carried away and ended up having to make adjustments...whoops!

The message on the butterfly just in case you can't read it is Ovarian Cancer's slogan which really put things in to perspective for me on how silent this type of cancer is and gets easily missed.


Ovarian Cancer; it whispers, listen.


Please click the Ties that Bind Link to read more about the symptoms:


<-----check the archives to view previous posts

Friday, September 12, 2008

Crafty Blogger Blurb Friday!

I'm starting to get caught up and on time again with my Crafty Blogger Blurb Links. Please check them out as they change each week. I always find interesting tidbits when I visit each link.
ENJOY!

Cathie Filian My hubby and I tested the new goats milk soap base at Michaels. Two thumbs up!

Craftside-A behind-the-scenes peek at a crafty world What ever your medium there is information and inspiration a-go-go this week with a crazy quilt embroidery motif, bullet casing bracelet how-to, duplicate stitch wing pattern and tutorial, decorative paper stencil patterns, and the altered book technique of "Highlighting Text."

About Family Crafts Let everyone know... What holiday season inspires your creativity the most?

Stefanie Girard's Sweater Surgery The "heavy guns" were brought out this week at Sweater Surgery with the band sawing of shotgun shell up cycled jewelry and the leather work gloves used in the creation of cairns.

About.com Cross Stitch The 2008 Cross Stitch Forum Ornament Exchange is on - find out how to participate then create your ornaments and enjoy.

Crafty Princess Diaries Tammy is still thinking about the good ol' days and tie-dye. Here's a great video she found on YouTube that gives you the 411.

The Impatient Blogger Who knew hook rugs were such a hot button topic? Madge continues to ponder the future of the craft industry in this sequel to last week's post.

Layers Upon Layers Mixed media artist Christy Sobolewski shares her artistic passions.


<----check the archives to view previous posts

Thursday, September 11, 2008

Day of the Dead cometh early!

Day of the Dead cometh early!

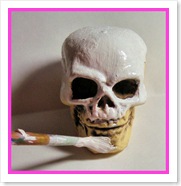
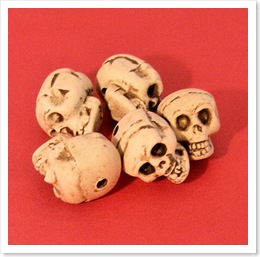
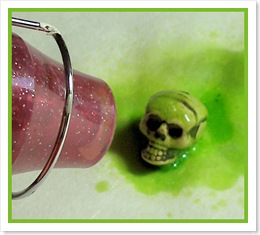
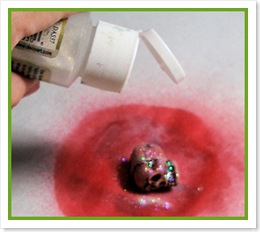
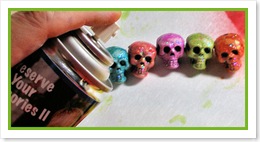
I had some fun yesterday playing again creating some funky colored skull beads. The more I learn about El Día de los Muertos (Day of the Dead) the more captivated I am by the bright colors and imagery used, as well as it's message. Check out my fun creative process below:

lrgskullbeds

<--- Here's what the skull beads looked like before I colored them


skullbd1

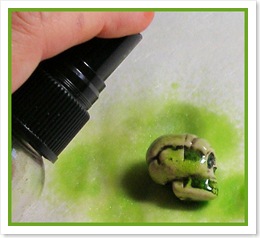
There are many ways you cancolor these skull beads, I chose to use my Color Mists and was amazed at how well they took them.

skullbd2

I next used the heat gun to dry the Color Mists slightly before I moved on to my next step...

skullbd3

In this next step I sprinkled lightly with extra fine Crystal Glitter Dust (this glitter is extra fine and should be added while the piece is still slightly wet. It will stick to the wet paint without having to use any adhesives). *Optional you can mist slightly again and then dry once more with the heat gun (avoid using your fingers to move the bead around use a pencil or end of a paint brush until piece is dry).

skullbdfin2

Once I was all done coloring my beads I sealed them with PYM II

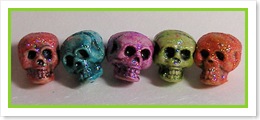
skullbdfin

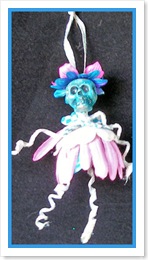
Here's my finished beads! Hmm..now what do you do with them...I have lots of ideas running through my mind. Just for fun I couldn't resist making a wee Day of the Dead Fairy (check out my fairy tutorial to see how to make it substituting the bead used).

skullfairy

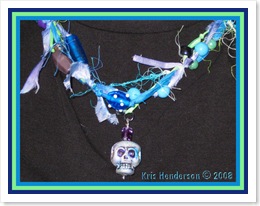
As for being really creative my friend Kris made some awesome neckwear using the colored skull beads. Only difference isn't a glitter queen like I am LOL

silkgrunge1

silkgrunge-003

Check back for more Day of the Dead projects and click the HERE to view more Day of the Dead and Halloween product and ideas.

Happy Creating!

Wednesday, September 10, 2008

She was a good little witch!


I've had a lot of people ask me what else they could do instead of soldering and this is what I came up with. I used the following supplies to make my good witch necklace.
Multi-surface Adhesive
Image (I used a witch image from my Halloween 2 Collage Sheet)
*Ribbon
*2 way Sticky Tape (red liner tape) or gaffer's tape with adhesive
I sandwiched the image with a back image between the two pieces of glass and then wrapped the gaffer's tape tightly around the edges of the sandwiched glass and then folded it over smooth and tight. I used the multi-surface adhesive to glue the bull clip onto the glass and once try I added the ribbon.
*Instead of the gaffer's tape you could also use red liner two way sticky tape wrapped around the glass edges and then add ribbon and fold over.


<--- check the archives to view previous posts

Sunday, September 07, 2008

The spell has been broken!

Omygosh! my art dry spell has been broken WHOOHOO!! I feel so freed....Yes, I know it may not last (shh!!) but the feeling of actually creating something again was liberating! I was beginning to feel like a thirsty person crawling across the desert in search of water! Try as I might I'd sit at my work area and attempt various pieces, but I couldn't get myself to go further to completion Arrrgg! talk about frustrating AND feeling like part of me was missing!! I love creating Halloween pieces it seems to be the perfect no fail motivator for me. I think we probably all have something that can instantly get our creative juices churning...what's yours?
Here's a Halloween card (This may not be a complicated piece but it definitely was a fun pieces to create) and new Halloween 2 and Day of the Dead college sheets I created below:


Supplies Used
  • Card stock or background paper
  • Images (I used an images from my Halloween 2 Collage Sheet and wording)
  • Label Bracket (II used one of the label brackets I have and colored it with a Gold Leafing pen to change the color.
  • Gaffer's Tape (I found this locally from 7 Gypsies but this can be optional or you can use ribbon.)
  • Dimensional Adhesive (such as Diamond Glaze, or Crystal Lacquer)
  • Gold Leafing Pen
There's not much to explaining this piece other then I layered the image I used with left over card stock and colored the pumpkin eyes with watercolor pencils. I then added some dimensional adhesive over the coloring on the eyes, nose and mouth to give it some depth. I also added the witches hat from the collage sheet. The mask I applied dimensional adhesive to and then sprinkled lightly with the glitter dust. The label brackets as I mentioned were not the color that I wanted so I colored them with a gold leafing pen and added it to the card with the wording behind it. The gaffer's tape was cut in half and folded over around each side of the card.


5 Collage Sheet Special!
I thought I'd spread my excitement by offering a 5 college sheet special. The top two college sheets are new and the bottom two are ones I've already had.
  • 3 Halloween Themed Sheets
  • 1 Gypsy Themed Sheet
  • 1 Day of the Dead Sheet
Click HERE to order 
the 4 sheet special

Happy Creating!

Saturday, September 06, 2008

Crafty Blogger Blurbs


Layers Upon Layers Where does Cyndi find all those artists that are profiled on Layers Upon Layers? Would you like to be one of them?

Stefanie Girard's Sweater Surgery Paper is going under the knife this week at Sweater Surgery with type strips being used as photo corners on ATCs.
About.com Cross Stitch Connie profiles Melinda Medeiros, the designer behind Medeiros Needlecraft Designs.

About Family Crafts Find out how to create a fun apple craft using a paper bag and a few other supplies. The finished craft can be used as an ornament, a magnet, or a brooch and it would make a great gift for a special teacher.
The Impatient Blogger What happened to the creative? Madge ponders the homogenization of the craft aisles in this provocative first half of a two part post.

Craftside-A behind-the-scenes peek at a crafty world This week features two new books releases; Beadwork Inspired By Art and Fashion Trims and we wouldn't be Craftside without sneak peeks inside! See how to make freeform ribbon cut work embellishments and two jewelry projects inspired by paintings. There are also pictures of the fabulous samples from the book One-Piece Wearables and an origami envelope for last week's dimensional ornament, or for anything you want to envelop!

Crafty Princess Diaries Get some power over your crafting with this tie-dyed muslin bag project.

Thursday, September 04, 2008

Ovarian Cancer Awareness


September is Ovarian Cancer Awareness month! Please take a moment to read more about a worthy project that I'm honored to be a part of:

Our mission is simple in concept. Artists united in their creativity to benefit Ovarian Cancer Research Fund. Our project: Ties That Bind. A hand made doll created with heart and soul, donning hand embellished men’s dress ties and hand born charms. 100% of the profit goes to the OCRF, in support of their mission to help ovarian cancer patients and their loved ones.
If you click the link below you can see the beautiful charms and ties that have been created for this project and also learn more about the Myths and facts of Ovarian cancer.