
Below is my quick and easy process:
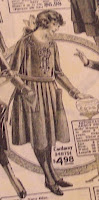
I first print the image out on Epson's Matte Photo Paper with an HP ink jet printer no sealing before hand.
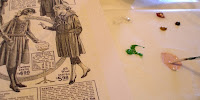 I begin by squeezing out small amounts of paint and thinning it way down with water. I like to use both a thin liner brush and a small filbert shaped brush.
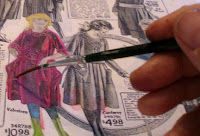
I don't get overly concerned with painting outside the image since I'll be cutting it out later.
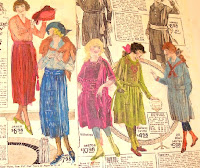
Here's a few finished images
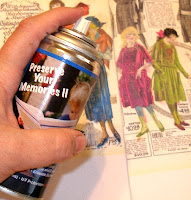
Once the images are dry I seal it with PYM II.
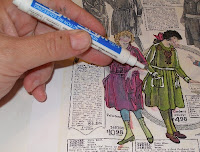
After I sealed it, I then outline and add detail with a black fine micron or sharpie pen, and then add highlights with a white sailor pen and gel pens.
 Here's the finished image after I've cut it out.
 I painted the background with the gouache paints on a gessoed Masonite board, I then added the image after scanning the piece and printed out a smaller image of it, so I could put it behind a wooden doll house window.
The saying reads:
"You never find the path to your self,
but rather, you find your true inner self
along the path inside you."
Merci de partager et de montrer tes techniques !! tu es une source d'inspiration
ReplyDelete(thank you for sharing your techniques, you are an inspiration for me)
friendly
Very cool. Lots of detail. It really changed it. That really turned out great. I will have to go and use mine now!
ReplyDeleteBelinda
BTW, you need to add (link) your blog to the bottom of your messages.
Thanks so much for the tutorial Aileen. I have a box of these(just had to them) and I have never opened it. Just didn't know what to do with them. Now I'm ready to give them a try. Your picture turned our great.
ReplyDeleteOh, my gosh!! Aileen, those are wonderful! So detailed and beautiful!! Thank you for such a great tutorial and also thank you for the "plug"! :) :)
ReplyDeleteYou always make such fun and inspirational art!! The kids are back in school and I'm ready to get creative.....this is a great springboard!!
xoxooxox
Susan Chong
The Artful Mama
beegsmachine@yahoo.com
That is so cool how you did that!!!!
ReplyDeleteI learn so much from you Aileen! You are a walking technique book. vicki
ReplyDeleteAileen, you make the coolest art and you are always so generous with sharing techniques. Your gouache is lovely.
ReplyDeleteJoanne
What a great teacher you are Aileen, this tutorial was fab, thanks for sharing - something else for me to have a go at
ReplyDeletehugs Dawn
Lovely use of gauche paints and wonderful, easy to follow tutorial! The final piece is inspiring! Love how you incorporated the doll house window to add dimension and interest. You're a great artist!
ReplyDeletehugs,
jackie
Thanks for all the eye candy and illustrated tutorials.
ReplyDeletecool technique, Aileen! Thanks for sharing!
ReplyDeleteAileen, enjoyed everything you have posted on your blog, scrolling down reading more and more helpful hints and techniques till we got to the big girl panties. To see them turned into a butterfly, now that has made my day !
ReplyDeleteWhat a Great Technique, Thank you for sharing. I will have to put this on my list of things to try when the kids are back in school. I love empherma. :)
ReplyDeleteScrapnmom
I love your technique here. The window is a wonderful touch.
ReplyDelete